Installation
Installing NVIDIA Isaac Sim
Note
We have tested Pegasus Simulator with Isaac Sim 5.1.0 release on Ubuntu 22.04LTS with NVIDIA driver 550.163.01. The PX4-Autopilot used during development was v.14.3. Older versions Ubuntu and PX4-Autopilot were not tested. This extension was not tested on Windows.
In order to install Isaac Sim on linux, download the zip file containing the Workstation Installation here or run the following lines on the terminal:
# Go to the home directory
cd ~

# Create a new directory to store the Isaac Sim installation
mkdir -p isaacsim
cd isaacsim

# Download the zip file containing the Isaac Sim installation
wget https://download.isaacsim.omniverse.nvidia.com/isaac-sim-standalone-5.1.0-linux-x86_64.zip

# Unzip the file
unzip isaac-sim-standalone-5.1.0-linux-x86_64.zip

# Run the post-installation scripts
./post_install.sh
./isaac-sim.selector.sh

# Delete the zip file
rm isaac-sim-standalone-5.1.0-linux-x86_64.zip
The short video with the installation guide for Pegasus Simulator is also available here, but the Isaac Sim install method presented is no longer available. You should follow the instructions above to install Isaac Sim 5.1.0. See video from 1:25 min onwards for the installation of Pegasus Simulator.
Configuring the environment variables
NVIDIA provides Isaac Sim with its own Python interpreter along with some basic extensions such as numpy and pytorch. In order for the Pegasus Simulator to work, we require the user to use the same python environment when starting a simulation from python scripts. As such, we recommend setting up a few custom environment variables to make this process simpler.
Note
Although it is possible to setup a virtual environment following the instructions here, this feature was not tested.
Start by locating the Isaac Sim installation by navigating to Isaac Sim’s root folder. Typically, in Linux, this folder can be found under ${HOME}/isaac_sim.
Add the following lines to your ~/.bashrc or ~/.zshrc file.
# ---------------------------
# ISAAC SIM SETUP
# ---------------------------
# Isaac Sim root directory
export ISAACSIM_PATH="${HOME}/isaacsim"
# Isaac Sim python executable
export ISAACSIM_PYTHON="${ISAACSIM_PATH}/python.sh"
# Isaac Sim app
export ISAACSIM="${ISAACSIM_PATH}/isaac-sim.sh"

# Define an auxiliary function to launch Isaac Sim or run scripts with Isaac Sim's python
# This is done to avoid conflicts between ROS 2 and Isaac Sim's Python environment
isaac_run() {

    # ------------------
    # === VALIDATION ===
    # ------------------
    if [ ! -x "$ISAACSIM_PYTHON" ]; then
        echo "❌ IsaacSim python.sh not found at: $ISAACSIM_PYTHON"
        return 1
    fi
    if [ ! -x "$ISAACSIM" ]; then
        echo "❌ IsaacSim launcher not found at: $ISAACSIM"
        return 1
    fi

    # -------------------------
    # === CLEAN ENVIRONMENT ===
    # -------------------------
    # Unset ROS 2 environment variables to avoid conflicts with Isaac's Python 3.11
    unset ROS_VERSION ROS_PYTHON_VERSION ROS_DISTRO AMENT_PREFIX_PATH COLCON_PREFIX_PATH PYTHONPATH CMAKE_PREFIX_PATH

    # Remove ROS 2 paths from LD_LIBRARY_PATH if present
    local ros_paths=("/opt/ros/humble" "/opt/ros/jazzy" "/opt/ros/iron")
    for ros_path in "${ros_paths[@]}"; do
        export LD_LIBRARY_PATH=$(echo "$LD_LIBRARY_PATH" | tr ':' '\n' | grep -v "^${ros_path}" | paste -sd':' -)
    done

    # -----------------------------
    # === UBUNTU VERSION CHECK ===
    # -----------------------------

    if [ -f /etc/os-release ]; then
        UBUNTU_VERSION=$(grep "^VERSION_ID=" /etc/os-release | cut -d'"' -f2)
    fi

    # If Ubuntu 24.04 -> use the Isaac Sim internal ROS2 Jazzy (ROS2 Jazzy bridge)
    if [[ "$UBUNTU_VERSION" == "24.04" ]]; then
        export ROS_DISTRO=jazzy
        export RMW_IMPLEMENTATION=rmw_fastrtps_cpp
        export LD_LIBRARY_PATH="${LD_LIBRARY_PATH}:${ISAACSIM_PATH}/exts/isaacsim.ros2.bridge/jazzy/lib"
        echo "🧩 Detected Ubuntu 24.04 -> Using ROS_DISTRO=jazzy"
    # If Ubuntu 22.04 -> use the Isaac Sim internal ROS2 Humble (ROS2 Humble bridge)
    else
        export ROS_DISTRO=humble
        export RMW_IMPLEMENTATION=rmw_fastrtps_cpp
        export LD_LIBRARY_PATH="${LD_LIBRARY_PATH}:${ISAACSIM_PATH}/exts/isaacsim.ros2.bridge/humble/lib"
        echo "🧩 Detected Ubuntu ${UBUNTU_VERSION:-unknown} -> Using ROS_DISTRO=humble"
    fi

    # ---------------------
    # === RUN ISAAC SIM ===
    # ---------------------
    if [ $# -eq 0 ]; then
        # No args → Launch full Isaac Sim GUI
        echo "🧠 Launching Isaac Sim GUI..."
        "${ISAACSIM}"

    elif [[ "$1" == --* ]]; then
        # Arguments start with "--" → pass them to Isaac Sim executable
        echo "⚙️  Launching Isaac Sim with options: $*"
        "${ISAACSIM}" "$@"

    elif [ -f "$1" ]; then
        # First argument is a Python file → run with Isaac Sim's Python
        local SCRIPT_PATH="$1"
        shift
        echo "🚀 Running Python script with Isaac Sim: $SCRIPT_PATH"
        "${ISAACSIM_PYTHON}" "$SCRIPT_PATH" "$@"

    else
        # Unrecognized input
        echo "❌ Unknown argument or file not found: '$1'"
        echo "Usage:"
        echo "  isaac_run                 → launch GUI"
        echo "  isaac_run my_script.py    → run script with IsaacSim Python"
        echo "  isaac_run --headless ...  → launch IsaacSim with CLI flags"
        return 1
    fi
}
In the remaining of the documentation, we will refer to the Isaac Sim’s path as ISAACSIM_PATH ,
the provided python interpreter as ISAACSIM_PYTHON and the simulator itself as ISAACSIM .
Running Isaac Sim
At this point, you are expected to have NVIDIA Isaac Sim fully installed and working. To make sure you have everything setup correctly, open a new terminal window (Ctrl+Alt+T), and test the following commands:
Check that the simulator app can be launched
# Run the simulator with the --help argument to see all available options
isaac_run --help

# Run the simulator. A new window should open
isaac_run
Check that you can launch the simulator from a python script (standalone mode)
# Run the bundled python interpreter and see if it prints on the terminal "Hello World."
ISAACSIM_PYTHON -c "print('Hello World.')"

# Run the python interpreter and check if we can run a script that starts the simulator and adds cubes to the world
ISAACSIM_PYTHON ${ISAACSIM_PATH}/standalone_examples/api/isaacsim.core.api/add_cubes.py
If you were unable to run the commands above successfuly, then something is incorrectly configured. Please do not proceed with this installation until you have everything setup correctly.
Addtional Isaac Sim resources: - Troubleshooting documentation
Installing the Pegasus Simulator
Clone the Pegasus Simulator:
# Option 1: With HTTPS
git clone https://github.com/PegasusSimulator/PegasusSimulator.git
# Option 2: With SSH (you need to setup a github account with ssh keys)
git clone git@github.com:PegasusSimulator/PegasusSimulator.git
The Pegasus Simulator was originally developed as an Isaac Sim extension with an interactive GUI, but also provides a powerfull API that allows it to run as a standalone app, i.e. by creating python scritps (as shown in the examples directory of this repository). To be able to use the extension in both modes, follow these steps:
Launch
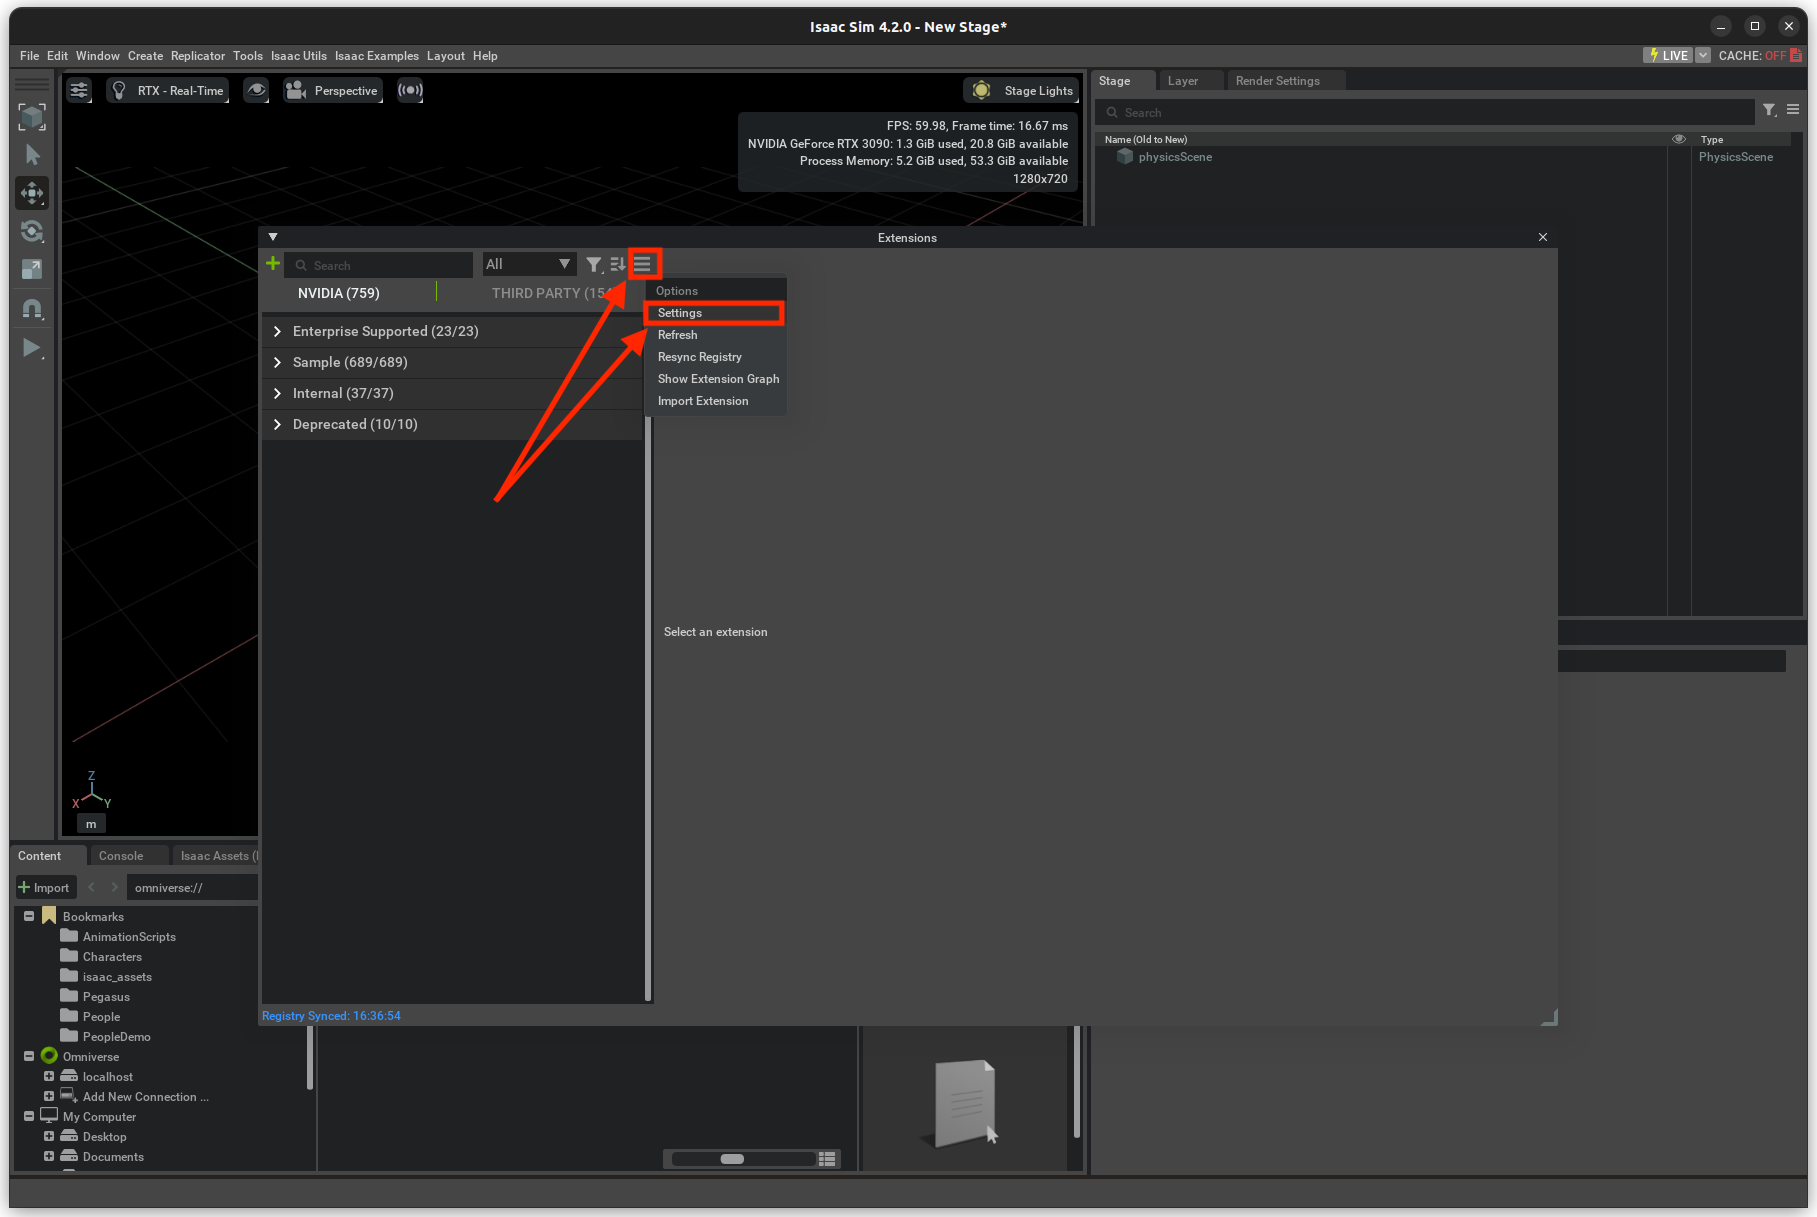
ISAACSIMapplication.Open the Window->extensions on the top menubar inside Isaac Sim.

3. On the Extensions manager menu, we can enable or disable extensions. By pressing the settings button, we can add a path to the Pegasus-Simulator repository.
The path inserted should be the path to the repository followed by
/extensions.
After adding the path to the extension, we can enable the Pegasus Simulator extension on the third-party tab.
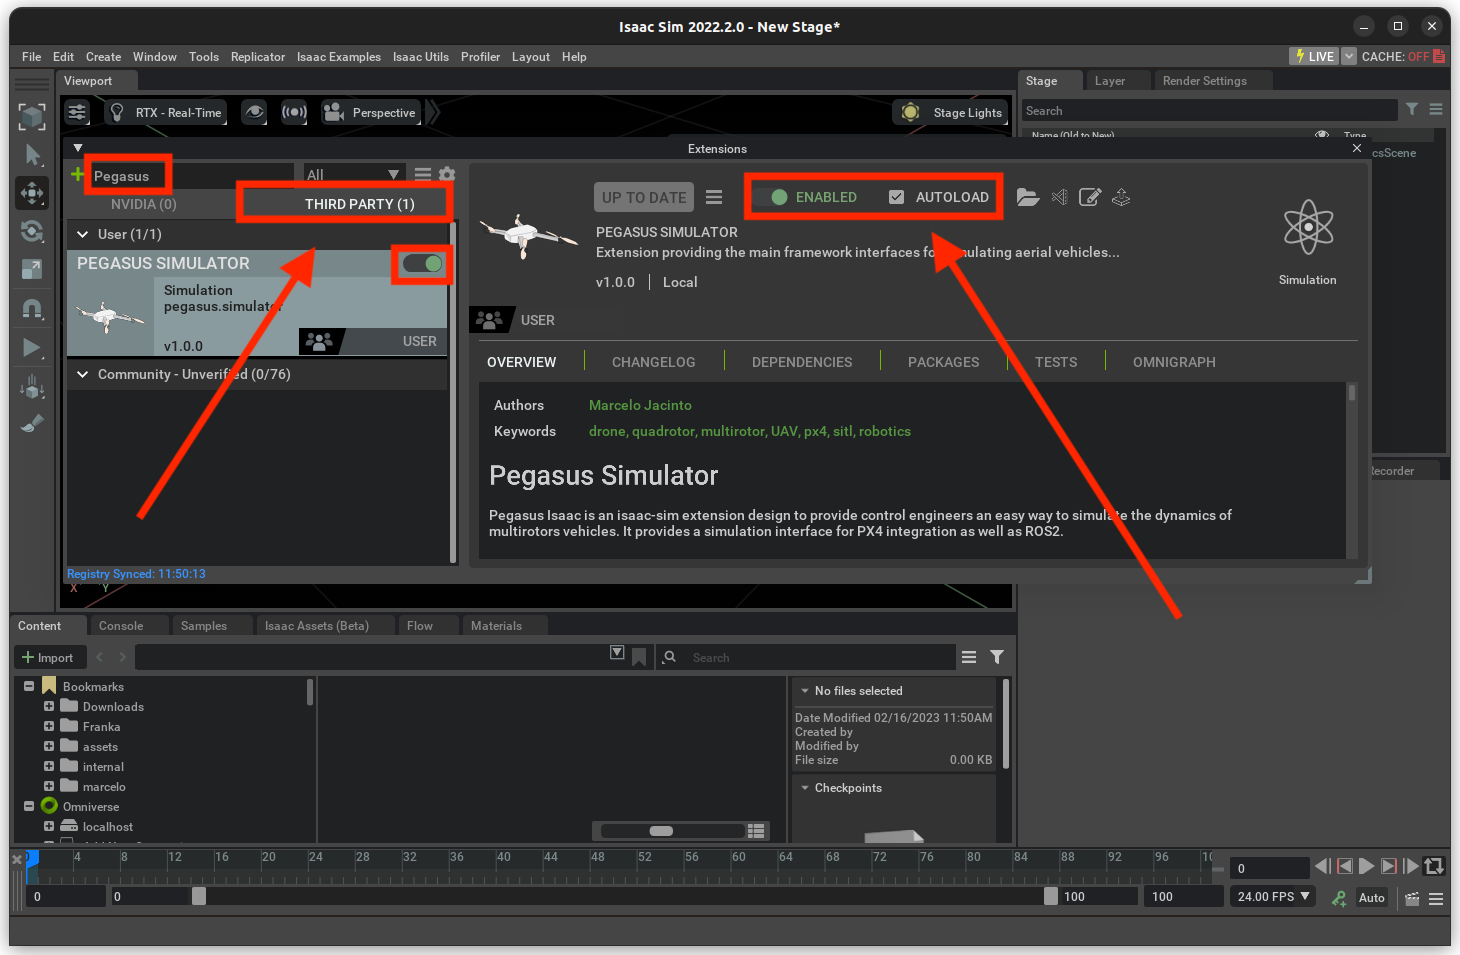
When enabling the extension for the first time, the python requirements should be install automatically for the build in
ISAACSIM_PYTHON , and after a few seconds, the Pegasus widget GUI should pop-up.
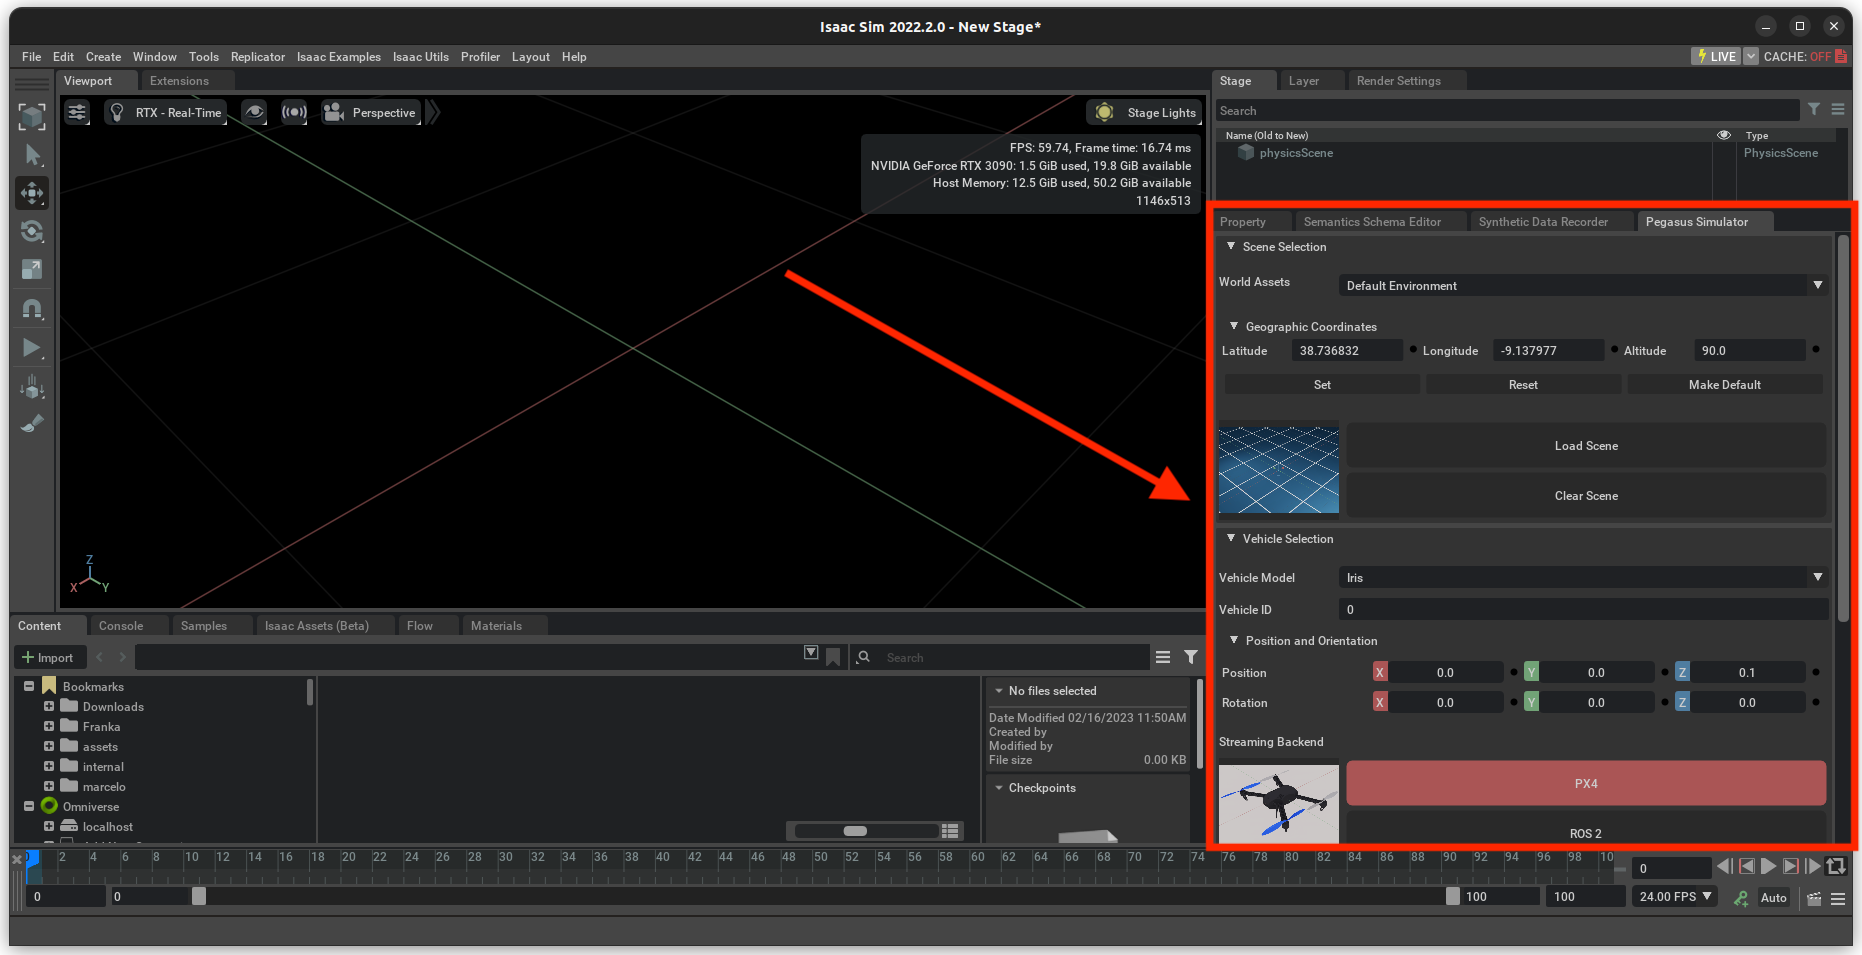
The Pegasus Simulator window should appear docked to the bottom-right section of the screen.
Installing the extension as a library
In order to be able to use the Pegasus Simulator API from python scripts and standalone apps, we must install this
extension as a pip python module for the built-in ISAACSIM_PYTHON to recognize. For that, run:
# Go to the repository of the pegasus simulator
cd PegasusSimulator

# Go into the extensions directory
cd extensions

# Run the pip command using the built-in python interpreter
ISAACSIM_PYTHON -m pip install --editable pegasus.simulator
We use the --editable flag so that the content of the extension is linked instead of copied. After this step, you
should be able to run the python standalone examples inside the examples folder.
Note
If you want to use Ardupilot with PegasusSimulator, please refer to the ArduPilot documentation to use this experimental feature. If you don’t know what Ardupilot is, you can safely ignore this.
Installing PX4-Autopilot
In this first version of the Pegasus Simulator (in extension mode), the GUI widget provided is only usefull if you intend to use the PX4-Autopilot. To install PX4-Autopilot, follow the following steps:
Install the dependencies (to be able to compile PX4-Autopilot):
# Linux packages
sudo apt install git make cmake python3-pip

# Python packages
pip install kconfiglib jinja2 empy jsonschema pyros-genmsg packaging toml numpy future
Clone the PX4-Autopilot:
# Option 1: With HTTPS
git clone https://github.com/PX4/PX4-Autopilot.git
# Option 2: With SSH (you need to setup a github account with ssh keys)
git clone git@github.com:PX4/PX4-Autopilot.git
Checkout to the stable version 1.14.3 and compile the code for software-in-the-loop (SITL) mode:
# Go to the PX4 directory
cd PX4-Autopilot

# Checkout to the latest stable release
git checkout v1.14.3

# Initiate all the submodules. Note this will download modules such as SITL-gazebo which we do not need
# but this is the safest way to make sure that the PX4-Autopilot and its submodules are all checked out in
# a stable and well tested release
git submodule update --init --recursive

# Compile the code in SITL mode
make px4_sitl_default none
Note: If you are installing a version of PX4 prior to v1.14.1, you may need to go to change the default airframe to be used by PX4. This can be achieved by:
# Go inside the config folder of the pegasus simulator extension
cd PegasusSimulator/extensions/pegasus/simulator/config

# Open the file configs.yaml
nano configs.yaml

# And change the line:
px4_default_airframe: iris
You can also set the PX4 installation path inside the Pegasus Simulator GUI, as shown in the next section, or by editing
the file PegasusSimulator/extensions/pegasus/simulator/config/config.yaml and setting the px4_dir field to the correct path.
Setting the PX4 path inside the Pegasus Simulator
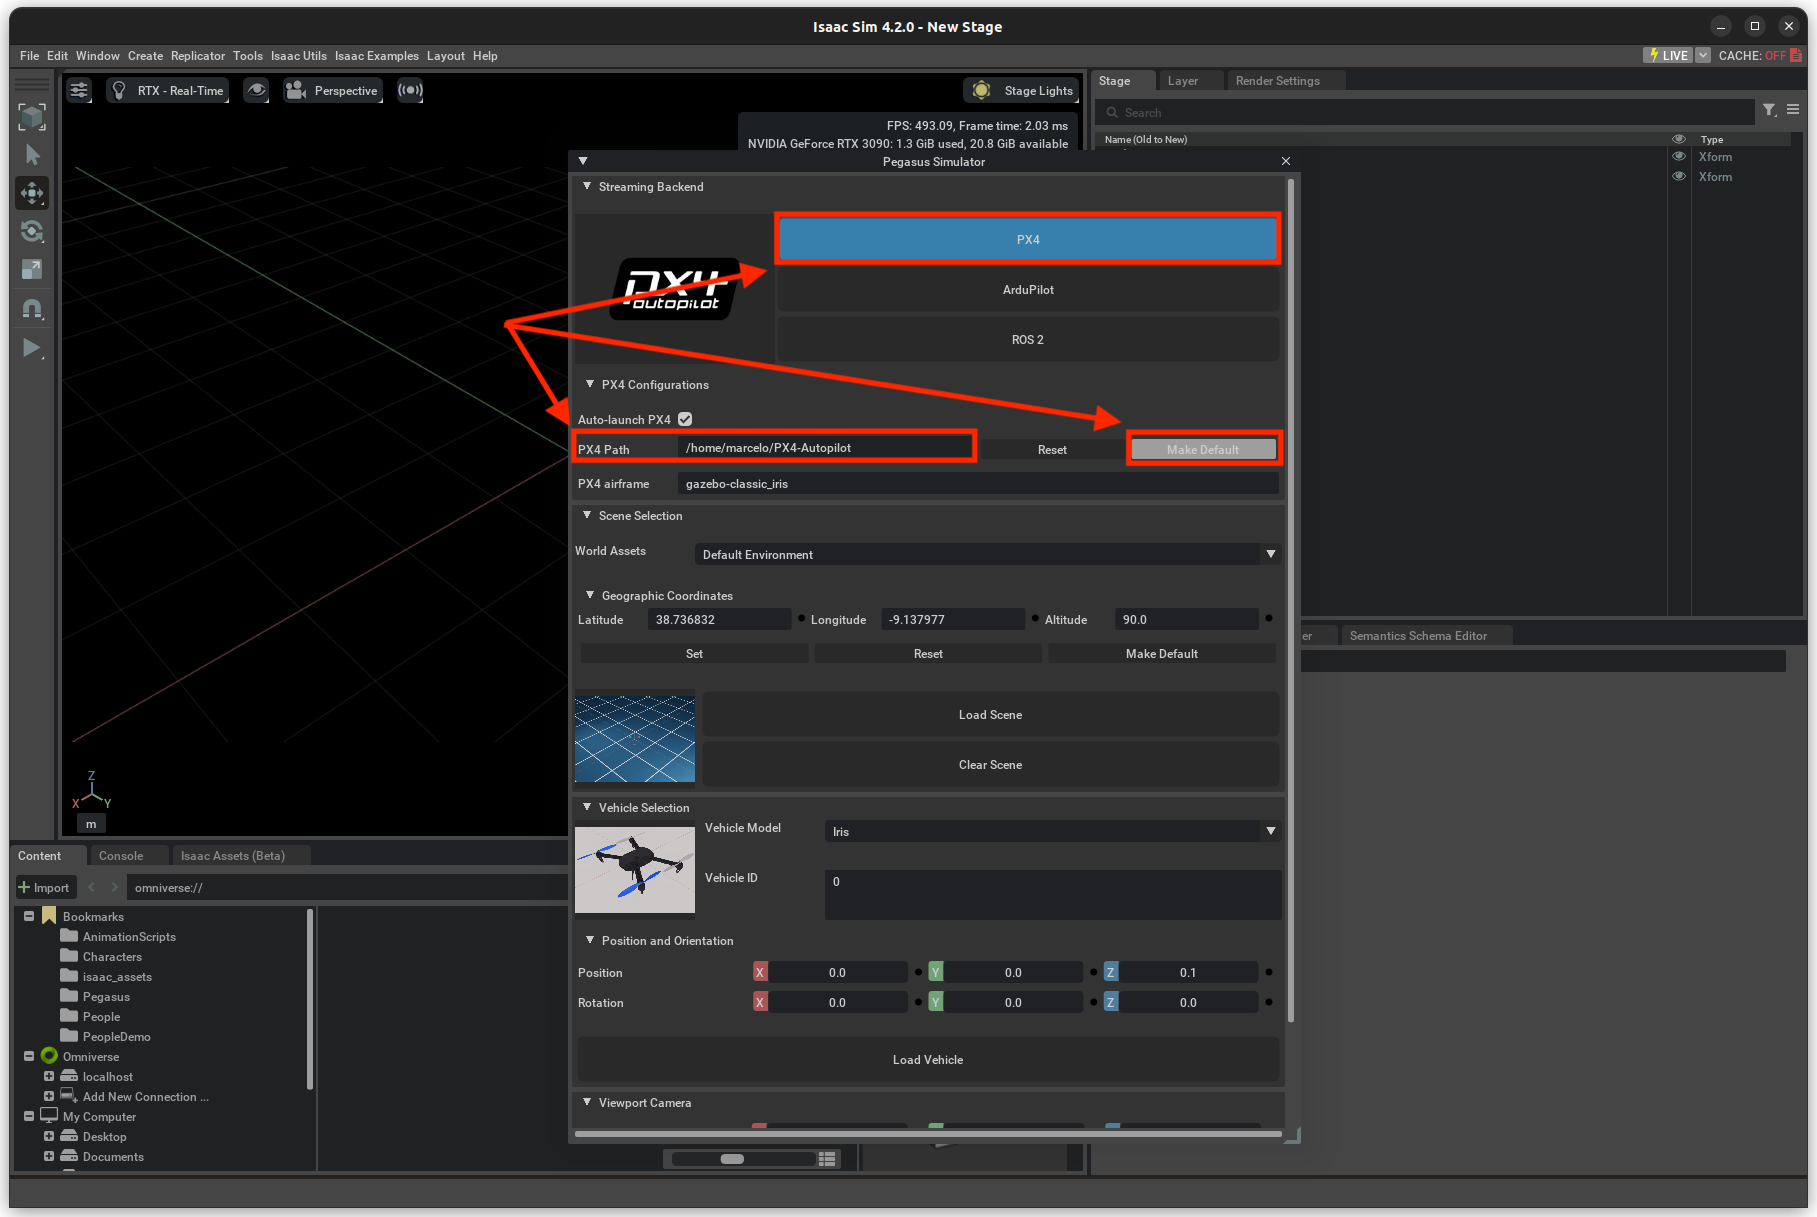
The simulator provides a feature to auto-launch PX4-Autopilot for every vehicle that is spawned in the simulation world.
For this feature to work, we need to tell the Pegasus Simulator extension where the PX4-Autopilot directory can be found.
For that, edit the PX4 Path text field if is not correct by default and press the Make Default button. This
field supports relative paths to the home directory, which means that you can use ~ to represent the home directory
without hard-coding it.
By default, the extension assumes that PX4-Autopilot is installed at ~/PX4-Autopilot .